
Meriworks ImageVault is frequently updated through continuous releases via Nuget. When coupling this with Episerver it works great and quickly become a part of any normal development/maintenance cycle. What isn’t included in that cycle is the actual ImageVault server, I made a big leap myself from 4.7 to 5.5.
Notable changes between 4.x to 5.5
The main difference is that the Windows service-based hosting model is gone and have been replaced with a web based server and installation instead, thus also removing the need for the Episerver Deployment Center.
There is no longer any support for unsigned certificates when using the Episerver Connector. This means that you either need to get a certificate or run the ImageVault web site unencrypted.
The entire changelog is available here, http://www.imagevault.se/en/documentation/api-documentation/?v=v5.0&page=installation/changelog.html
The upgrade process
The official documentation is available here, http://www.imagevault.se/en/documentation/api-documentation/?v=v5.0&page=installation/imagevault5.html
The process I do will look like this
- Backup old ImageVault instance database
- Download and setup the new ImageVault service, I will use IIS in this post
- Copy any files from the old App_Data\DiskStorage
- Update and configure the Episerver ImageVault Client
Backup and restore
Backup any data before proceeding, in my case the database is enough since I will put everything on a new server.
According to the official documentation any ImageVault instances interfacing the database should be deactivated. I will however not upgrade any existing database but instead restore the backup to a new database, thus keeping the old database as fallback.
Backup and restore in accordance with your preferences.

Download and setup the latest version
Download http://www.imagevault.se/en/documentation/api-documentation/?v=v5.0&page=installation/download.html
I’ve extracted my release to C:\ImageVault\Web\5.5.182
To setup the web application either use the GUI way in accordance with the documentation of do it using PowerShell (yes, PowerShell! We’ve been able to do this since 2008).
Gui
You know the rest, if not follow the official documentation for IIS http://imagevault.se/en/documentation/api-documentation/?v=v5.0&page=installation/imagevault5.html#IISWebSite
PowerShell
The script below will setup a new or update and existing ImageVault IIS web site, it use a simplified version of the autostart and does not to this date include the implemented autostart provider from Meriworks. This approach will however suffice in most scenarios.
Pay attention to the variables and set those according to your requirements
### Enable if required
#Import-Module ServerManager
#Add-WindowsFeature Web-Scripting-Tools
#Add-PSSnapin WebAdministration

### Variables, set these up according to your needs
$hostName = "imagevaultweb.whatever.com"
$port = "80"
$ssl = $false #$true or $false
$appPoolName = "imagevaultweb"
$appPoolDotNetVersion = "v4.0"
$iisAppName = "ImageVaultWeb"
$directoryPath = "C:\ImageVault\Web\5.5.182"

### Implementation
# Setup the ImageVault app pool
cd IIS:\AppPools\

$appPool = Get-ChildItem IIS:\AppPools\ | Where-Object { $_.Name -eq $appPoolName }

#check if the imagevaultweb app pool exists
if (!$appPool)
{
    #create the app pool
    $appPool = New-Item $appPoolName
    $appPool | Set-ItemProperty -Name "managedRuntimeVersion" -Value $appPoolDotNetVersion
    $appPool | Set-ItemProperty -Name "managedPipelineMode" -Value "integrated"
    $appPool | Set-ItemProperty -name "enable32BitAppOnWin64" -Value "false"
    $appPool | Set-ItemProperty -name "startMode" -Value "AlwaysRunning"
}


$site = Get-Website -Name $iisAppName

#check if the site exists
if ($site)
{
    # check if the site path has changed
    if($site.physicalPath -ne $directoryPath)
    {
        $site.physicalPath = $directoryPath
        $site.Update()
    }

    # check if the application pool has changed
    if($site.applicationPool -ne $appPoolName)
    {
        $site.applicationPool = $appPoolName
        $site.Update()
    }

} else {
    # create new site
    if($ssl)
    {
        $ite = New-Website -Name $iisAppName -ApplicationPool $appPoolName -Port $port -HostHeader $hostName -PhysicalPath $directoryPath -Ssl
    } else {
        $site = New-Website -Name $iisAppName -ApplicationPool $appPoolName -Port $port -HostHeader $hostName -PhysicalPath $directoryPath
    }

    # set preloadEnabled for autostart of application
    Set-ItemProperty "IIS:\Sites\$($site.name)" -Name applicationDefaults.preloadEnabled -Value True
}


### Set acls

# Create acl objects for the imagevault applocation pool
$appPoolAclDirectory = New-Object System.Security.AccessControl.DirectorySecurity
$appPoolAclDirectory.SetOwner([System.Security.Principal.NTAccount]"IIS AppPool\$appPoolName")
$appPoolAclFile = New-Object System.Security.AccessControl.FileSecurity
$appPoolAclFile.SetOwner([System.Security.Principal.NTAccount]"IIS AppPool\$appPoolName")

Set-Acl -Path "$directoryPath\scripts" -AclObject $appPoolAclDirectory
Set-Acl -Path "$directoryPath\styles" -AclObject $appPoolAclDirectory
Set-Acl -Path "$directoryPath\web.config" -AclObject $appPoolAclFile
The ImageVault Setup
Navigate to the site and follow the steps, this is well documented in the setup documentation from ImageVault, http://www.imagevault.se/en/documentation/api-documentation/?v=v5.0&page=installation/imagevault5Setup.html. I will however provide a few tips below
ConfigureWindowsPlatformStep
The installer will suggest paths placing the storage folders inside the app_data folder. My preference is to move the folders to a more central location where they aren’t dependent of the current ImageVault version.
In example C:\ImageVault\App_Data\ or possibly C:\ImageVault\<applicationName>\App_Data\
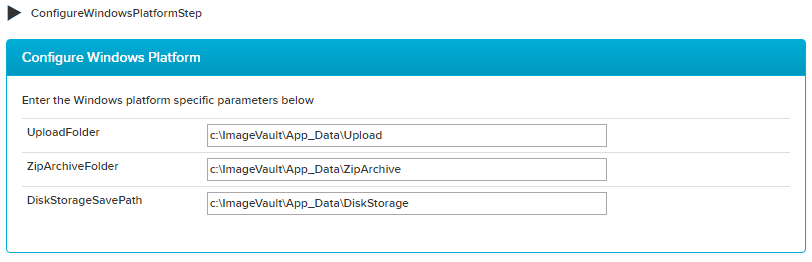 You will also need to copy the contents of the old DiskStorage found in the folder \ImageVault\Core\<old instance>\App_Data\DiskStorage to the new DiskStorage folder
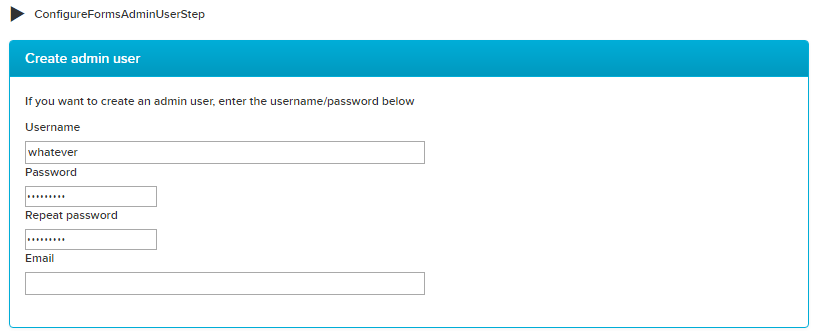
ConfigureFormsAdminUserStep
Even if this step is optional I advise you to create a local admin user. If your external authentication is bricked for some reason you’ll need this account to configure new SDK-users etc. If you set an admin user you will need to login to confirm the user right after this step
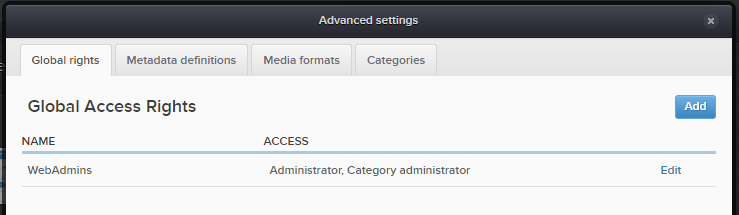
Complete the setup and check what happened in the Advanced settings > Global rights
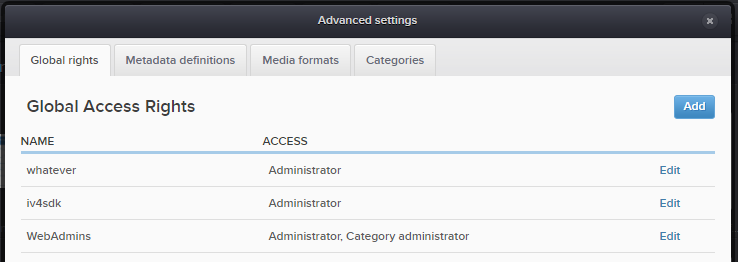
When comparing with the old installation we can see the iv4sdk user and the new admin-user (image from old installation below)
Connecting Episerver to the new ImageVault installation
Update the ImageVault Nuget Packages in Episerver to the latest version.
Update the ImageVault.client.config settings
The imageVaultCore address needs to be updated with an apiv2 path
<imageVaultCore address="https://imagevaultweb/apiv2/"/>
I did also need to add the ImageVaultUiUrl to connect the new ImageVault web to the Episerver OnlineCenterMenu menu
<add key="ImageVaultUiUrl" value="https://imagevaultweb" />
The config options documentation is available here, http://www.imagevault.se/en/documentation/api-documentation/?v=v5.0&page=connectors/episerver/installation/developer.html
Deploy and clean up the IIS host
Deploy the updates and remove the old ImageVault sub application and perform an IISRESET. You can also remove the old UI-installation, typically available in C:\imagevault\ui\myimagevault
Time to test the Episerver connector
Load the CMS Edit user interface
All good? Read no further, you did great!
The most common error is access token errors
[Unable to request access token @ https://imagevaultweb/apiv2/oauth/token.]
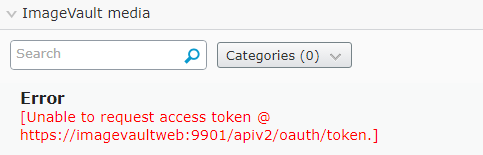
Access token errors can depend upon several reasons
- Did you setup the site using https and forgot to add a certificate?
- Add a signed certificate to the IIS site running ImageVault
- …or set the site to use unencrypted http traffic instead, change the imagevault.client.config accordingly
Do the error include the apiv2? (https://imagevaultweb/
apiv2
- /oauth/token)
- If not, add it and try again
- Your SDK password might have been smoked during the restore, in that case the password must be reset or changed
- This can be done in the utility admin panel that can be found at https://imagevaultweb/Utility/ClientIdentity

- This can be done in the utility admin panel that can be found at https://imagevaultweb/Utility/ClientIdentity
- Have you removed the old ImageVault virtual folder from the Episerver IIS-site?
- If not, remove it. You must also do an IISRESET after removing it
That’s it!